

Well over a year ago I bought
a cardigan by Marks&Spencer in one the second hands belonging to my hunting
ground. It cost only 40 CZK (1,5 E/2 USD), so I didn’t really mind that the
color doesn’t match absolutely anything in my wardrobe. You might have seen it
worn in the “Bride of the Water God” outfit, but that was the only time I wore
it. So I decided something needed to be done about it, and it occurred to me
that I could try ribbon embroidery. I’m really happy with the result, and I
think that it can be used for cardigans of all colors - a white one with pastel
or black flowers, black one with pretty much any color, pastel ones, jewel
tones would look cool with metallic ribbons. And it’s really easy and quick -
this was my first time trying this kind of embroidery and even though the
flowers could have been a bit more neat, I’m pretty happy, especially since I
used scraps of ribbons I had in my ribbon box.

Material:
Cardigan
Scraps of
ribbons (25 - 30 cm/flower)
Thread
Needle with
blunt end
Beads
Scissors
Time:
1
minute/flower
Difficulty:
Pretty easy
How to:
I used the
basic stitches that can be found here.
1) Tie a
knot at one of the ends of the ribbon scrap, cut the end diagonally, and pull
the other one through the needle.
2) Thread
the ribbon form the wrong side to the right side - this way, you’ll have the
ribbon secured by the knot on the wrong side.
3) Proceed
to embroider the petals according to the tutorials.
4) Thread
the ribbon from the right side to the wrong one, make a knot as close to the
surface of the fabric as possible and cut off the remaining piece of ribbon. If
you have 5 or more cm left, you can use it to make a small bud - like here. Cut
the very end of the ribbon behind the knot diagonally.
5) After embroidering all the individual flowers,
sew the beads on. I used one thread for about each 1/3 of the flowers, but I
sewed it up every time I proceeded to the next flower. 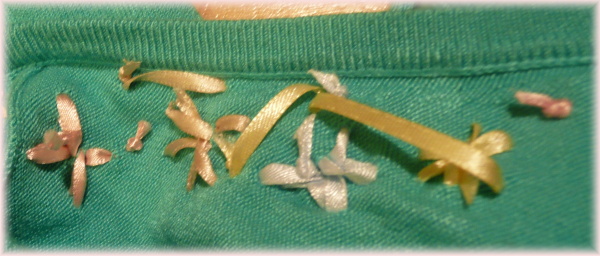


Ta-da!
I made a single line around the button line and
also around the neckline. But obviously, you can do whatever you want with this
technique. The only must is a needle with a blunt end, because it doesn’t
damage the knit. I’m no expert, but I think this technique can be only used on
fabrics with sparse structure, because the ribbons, even when thin, are still
pretty thick compared to the structure of e.g. poplin. Knitted clothes seems to
be a good match for this embroidery. 


Yours truly
Vita
__________________________________________________________
Víc než před rokem jsem si koupila v jednom ze
sekáčů spadajících do mého loviště kardigan od Marks&Spencer za 40 Kč,
takže mi nijak nevadilo, že se nehodí absolutně k ničemu, co vlastním.
Mohli jste si ho tedy všimnout ve článku „Bride of the Water God“, ale to bylo
poprvé a naposled, co jsem si ho vzala na sebe. A to jsem se rozhodla změnit.
Napadlo mě, že bych mohla zkusit výšivku stuhami. Jsem s výsledkem velmi
spokojená a myslím, že je to technika použitelná pro svetříky všech barev -
bílý s pastelovými nebo černými kytičkami, černý v podstatě
s čímkoliv, tmavé, syté barvy by vypadaly skvěle s metalickými
stuhami. A navíc je to velmi snadné a rychlé - tohle byl můj první vyšívací
pokus se stužkami a, ačkoliv by samozřejmě kvítky mohly být úhlednější, jsem na
svůj výtvor celkem pyšná, obzvláště proto, že jsme použila výhradně odstřižky
stuh, které jsem vyhrabala v krabici s mašlemi.
Materiál:
kardigan
kusy stuh (25 - 30 cm/kytička)
nit
jehla s tupým koncem
korálky
nůžky
Čas:
Minuta na každou kytičku
Návod:
Použila jsem základní stehy, které můžete najít tady.
1) Na jednom konci stuhy uvažte uzlík a to, co za ním trčí,
zastřihněte šikmo, druhý konec stuhy provlečte jehlou.
2) Protáhněte jehlu z rubu na líc, uzlík zafunguje jako
kotva jistící stuhu před vytržením.
3) Vyšijte kytičku dle návodu.
4) Protáhněte stuhu z líce na rub a udělejte uzlík co
nejblíže vpichu. Pokud by vám přebýval větší kus stuhy, můžete udělat
poupátko/tečku jako zde. Opět konec za uzlíkem sestřihněte šikmo.
5) Po dovyšití všech kytiček našijte korálky, já použila
jednu nit na cca každou třetinu kytiček, ale u každé kytky jsem ji zapošila.
A hotovo :)
Udělala jsem jednoduchou linku podél zapínání a výstřihu.
Ale samozřejmě můžete vyšít cokoliv chcete - jen si dejte pozor, abyste použili
jehlu s tupým koncem, který nepotrhá vlákna pleteniny. Nejsem odbornice na
tuhle techniku, ale mám pocit, že jde použít jen na materiály s řidší
strukturou, protože i tenká stuha je pořád celkem tlustá oproti mezerám mezi
vlákny průměrné látky.
S láskou
Víta
To je perfektní! *_* Roztomilé oživení. ^^
ReplyDeleteDěkuju :)
DeleteNikdy mě nepřestaneš udivovat svou kreativitou a nápaditostí! Třeba tohle by mě nikdy nenapadlo... a přitom je to tak krásné a (prý jak říkáš) i snadné. Moc se mi líbí i ta kombinace barev. (*_*)
ReplyDeleteMoc děkuji <3
DeleteOhhhh I love it so much it's so cute! Actually I have some old cardigans I'll try to do this to them ;)
ReplyDeleteThank you! Yeah, you should - I'd love to see your version <3
Deletegreat job! your cardi looks so sweet now :)
ReplyDeletexoxo
mochaccinoland.blogspot.com
Thank you! <3
DeleteKrása!! Mám úplně ten samý, taky ze sekáče, akorát ve fuchsiové barvě!
ReplyDeleteDěkuju <3
DeleteSuch a cute and sweet idea! Thanks for sharing! :)
ReplyDeletecallmemaddie.blogspot.com
It is so beautiful now! Thanks for sharing the pics =)
ReplyDeleteThank you :)
Delete1. This is so going to my bookmarks to try sometime /make my mom try (I'm useless with as needle). What a great idea, thank you for the "How-to"!
ReplyDelete2. This came out so beautiful, the colors are perfect together!
3. OMG is M&S making the cardigans with the satin covered buttons again? NEED!
4. I love lists!
Thank you so much! <3
DeleteHaha, the cardigan is second hand, so I guess it's from the "satin button" era, rather than being a resurrection of some previous line.